Getting Started
Getting SuperDOF running only takes a few steps: download it, run the setup command, add your DOF config files, and set it to start with Windows.
SuperDOF replaces DOF and DOFLinx, so you do not need to install either of them. If you already have DOFLinx set to start with Windows, remove it from your startup folder so the two programs are not running at the same time.
1. Download SuperDOF
- Create a folder for SuperDOF, for example
C:\SuperDOF. - Download both files and save them into that folder:
You can also find them on the releases page. superdof.exe is the version that runs in the background, and superdof-console.exe is the same program with a window, which you use for the setup command and for testing.
If Windows SmartScreen warns you when you first run them, click More info and then Run anyway.
2. Run the setup command
- Hit the Windows key, search for
cmd, right click on Command Prompt and select Run as administrator. Administrator rights are only needed this one time, so setup can write into the game folders in Program Files. - Run the following commands:
cd C:\SuperDOF
superdof-console setup
Setup automatically finds Visual Pinball, Pinball FX, Pinball M, Future Pinball and PinUP Popper, and installs what each of them needs. It prints what it found and what it installed, and finishes with done: start superdof and leave it running.
Once SuperDOF is running, start the game, open Settings > Cabinet, turn on cabinet mode, and enable the DOFLinx option.
3. Add your DOF config files
SuperDOF uses the same config files as DOF. Follow the steps in Configuring DOF to create your config in the DOF Config tool and download it. Then, instead of copying the files to C:\DirectOutput\config, copy all of the directoutputconfig ini files into your C:\SuperDOF folder.
Pinball FX and Pinball M table files
For these games, SuperDOF uses the table files that come with DOFLinx. Download the zip from DOFLinx Files, unzip it, and copy the FX and Linx folders into your C:\SuperDOF folder. You don't need anything else from the DOFLinx download, and this step is not needed if you do not care about the backglass features.
4. Add a cabinet.xml file (addressable LEDs only)
If you are using addressable LEDs, use the Cabinet File Generator to create your cabinet.xml, and save it into your C:\SuperDOF folder. Make sure your DOF config also has the addressable LED outputs set up, as described in the Addressable LED Config File section.
If you are not using addressable LEDs, skip this step.
Your C:\SuperDOF folder should now contain:
superdof.exeandsuperdof-console.exe- your
directoutputconfigini files - the
FXandLinxfolders (if you play Pinball FX or Pinball M) cabinet.xml(if you use addressable LEDs)
5. Test it
In the command prompt, run:
cd C:\SuperDOF
superdof-console
Leave the window open and start a table. You should get feedback on your PinOne, and the window shows what SuperDOF is doing. Press Ctrl+C to stop it when you are done testing.
6. Set SuperDOF to start automatically
SuperDOF needs to be running for feedback to work, so set it to start with Windows:
Hit the Windows key, search for
runand hitenter.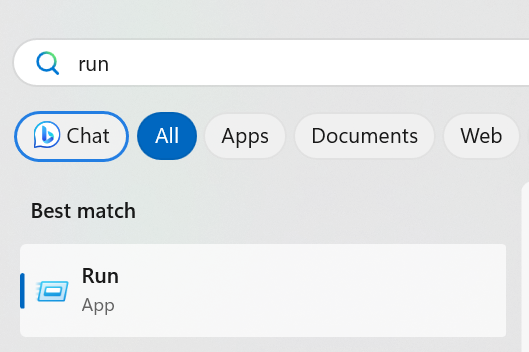
When the run dialog shows up, type in
shell:startupand hitok.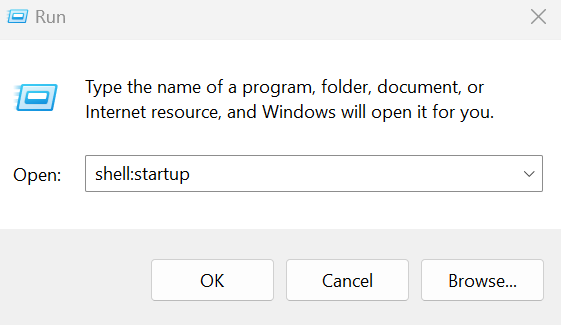
Inside the startup folder, right click and select New > Shortcut.
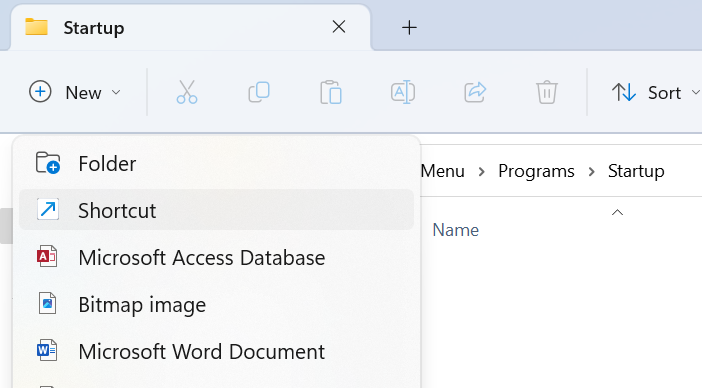
Browse to
C:\SuperDOF\superdof.exe(notsuperdof-console.exe), clickNext, thenFinish.
Now SuperDOF starts every time you start your computer. It runs in the background with no window. To start it now without restarting, just double click the new shortcut.
SuperDOF talks to the PinOne Ultra directly over USB HID, so you can turn off Legacy RS232 DOF Fallback in the config tool settings.
Troubleshooting
- No feedback at all: run
superdof-console devicesin a command prompt to check that SuperDOF can see your PinOne. - Checking what happened: when SuperDOF runs in the background, it writes a log to
C:\ProgramData\SuperDOF\superdof.log. - Going back to DOF: run
superdof-console restore-vpxandsuperdof-console restore-popperfrom theC:\SuperDOFfolder, remove the SuperDOF shortcut from your startup folder, and then follow the normal DOF and DOFLinx installation steps.